Introduction
More than half a year after her introduction, Miyamoto Musashi takes center stage at last in the events of the Shimousa Pseudo-Singularity. Shimousa, however, is a rather unique Singularity with gimmicks and conditions that greatly increase its difficulty. How difficult it is depends on whether a Masters pursues its bonus bond point conditions, and the strength of their own roster.
Regardless, in this short preparation article we’ll break down what makes Shimousa a bit more challenging than other Singularities, as well as offer some advice on supports to use to create a stronger team while still adhering to the bonus bond point conditions. Other than the basic premise of the Singularity, there should be no spoilers in here.
Forced Miyamoto Musashi Support
The largest issue facing Masters is that for each of the main boss battles, the story-support Miyamoto Musashi must be selected as part of the frontline team. Masters cannot put her in the backline nor try to rely on their friend Merlin.
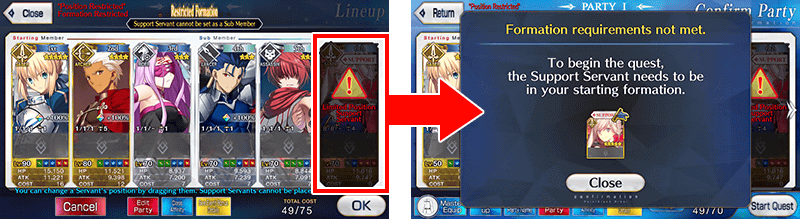
Unfortunately this also means any (new) Masters cannot borrow a fully class advantaged friend Servant to rely on either. Masters must fight their way through Shimousa by the strength of their own roster, their Command Seals if need be, and the story-supplied Musashi.
Musashi herself is another problem. Typemoon and Delightworks are not so merciful as to only introduce Berserker and Lancer bosses. Please. In many of these boss fight, Musashi is not a particularly great option, nor does she come with Craft Essences or stat improvements that any Master’s Servants have. In fact, she is hamstrung even more via her level or skill levels (as can be seen in the picture above).
It is not all bad though, as all story Servants do not have to brave the perils of the gacha to upgrade their Noble Phantasm. Unleashing Musashi’s NP will therefore still do terrific damage if Masters can get it charged.
Most importantly, Masters can employ the Chaldea Combat Uniform to Order Change Musashi to the backline after the Boss battle has started. It’s not a particularly canon approach, but it is certainly effective. It does limit one’s Mystic Code and strategy though.
On a final note: reading up on Musashi's kit is highly recommended to get a grasp on how to properly use her potential. With a BBBAQ-deck, Masters need to rely on a well placed Fifth Force activation to charge her NP, ideally triggering Overkill early in a strong NP Gain chain.
Knight Class Bonus Bond Points
The second issue facing ambitious Masters, is whether to take full advantage of the additional 100% Bond Points from fielding only Knight-class Servants (Saber, Archer and Lancer Servants). Adhering to this condition is entirely optional.
| Class | [Knight-class] Servants |
|
|
|
|
|
|
|
|
|
During filler quests in sections between big story bosses, the bonus condition is not that big of a deal, especially as this Singularity contains many Saber-class and Lancer-class enemies. In addition, Masters can select any support they prefer for the non-boss encounters, so borrowing a Caster or Berserker to deal with the vast amount of Assassin-class enemies is always an option without breaking the bonus bond point condition.
During boss battles though, sticking to the bonus condition represents a massive spike in difficulty. Without class advantage, and without the option to even borrow a class advantage (due to the forced Musashi), the enemy boss’s HP is essentially doubled, while damage taken is also increased overall. Considering all the bosses are challenging even with class advantage from the forced Musashi alone, the boss encounters with a full bonus are probably the hardest yet.
It certainly does not help that many Masters rely on Merlin, Waver, Tamamo, Waver, Mash or Jeanne, all of whom are not an option when chasing the full bonus. The largest issue facing a full bond bonus team is that support options are heavily restricted, and fielding a strong team comes from bringing together a well supported team with the few supports that are accessible (at the time of release).
To help you plan ahead a little, and to get ideas for a composition going, these are the support options available in the Knight classes.
| Umu Tier | |
|
| |
| Strong Offensive Support (skills) | |
|
| |
| Critical Star Generation | |
|
| |
| Taunt Servants | |
| NP Chargers | |
In general, Nero Bride is immensely powerful for all of the boss fights while sticking to the Knight-class condition given just how limited the options are. In addition, Masters need to rely heavily on Starting NP Gauge seeing as only Parvati and Helena (Archer) have the ability to charge allies.
David and Tristan are the go-to options for surviving (AoE) NPs, although Order Change may have to be used on Musashi.
Lastly, with teamwide buffs being fairly rare, CEs with powerful team support such as A Fragment of 2030, Golden Captures the Carp and Ox-Demon King are highly recommended.
In closing
Shimousa may seem daunting, especially to new Masters with very limited rosters. But if Masters forego the bonus bond points during the boss battles, the Singularity is far more manageable. Besides, the Singularity is not going anywhere, and Masters can use Command Seals at their leisure to push through the most tricky bits (even with the Knight class bonus).
As per usual, we’ll have a spoiler-free walkthrough and fully boss guide available by the time the event launches.