


Part 1: Assessing the Enemy
The very first step to consider for every single challenge quest is what enemies are actually contained in the node. If the fight would be an equation, a player’s team would be half of the equation while the enemies consist of the other half. In many cases, the right challenge team for the job is simply a team that can largely counter each of the challenge quest’s characteristics.
In this part of the guide, each step in assessing the opponents of a challenge quest will be examined. The steps are largely structured as follows:
- What classes will appear throughout the fight?
- Does the challenge quest contain a single boss or multiple waves of enemies?
- How does one manage the enemy AI and Noble Phantasm charge bar?
- What are the boss’s special gimmicks and abilities?
Part 1.1: Enemy Class Structure
Much like any normal node, the first thing to examine is what classes are contained in the challenge quest. Preferably, a team’s main source of damage will be a Servant with class advantage, as this effectively doubles their HP and ATK statistics. If there is no Servant of the right class available for this task, Avengers and Berserkers make for excellent, if at times weaker, substitutes. Berserkers and Avengers unfortunately cannot rely on the standard class triangle benefits as opponents will do full, if not increased, damage. Meanwhile whatever damage is put out does not benefit from the full 2.0x effectiveness modifier.
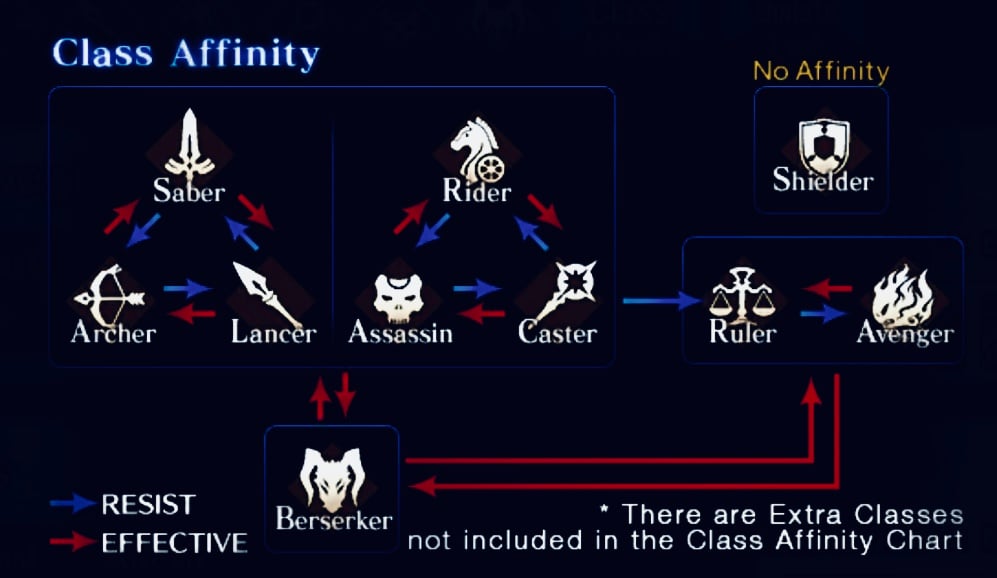
In cases where the challenge quest consists of multiple enemy classes, strong Avengers and Berserkers are a blessing to have available. Their damage output is relatively constant across different classes. Yet, while a challenge quest may contain a multitude of different classes, ensure that a team mainly counters the class of the largest threat.
There are a few Servants that exploit a particular weakness in the traits or characteristics of a boss. Abusing these can make a boss fight significantly easier especially if they coincide with a class advantage. For example, Euryale and Orion can turn any male enemy into mincemeat, Jack and Carmilla receive additional bonus damage when fighting females, and any divine or undead enemies get stomped on by Scathach. These trait skills often tend to scale significantly better than any other offensive buffs, and are something to look out for. Depending on the fight, it may be that the additional trait damage is more significant than running with class advantage.
Part 1.2: Enemy Opponent Structure
Not all boss fights are a single wave fight. Often, a few mobs need to be disposed of before the raid or challenge boss appears in all their glory. This is not always a drawback! Indeed, these initial waves can be exploited to the fullest to make sure that Servants can go into the boss wave prepared. Skills can be activated and Noble Phantasm gauges can be charged and ready to go. The objective in waves like these is to maximize the amount of Noble Phantasm gauge gained for the deployed Servants while doing as little damage as possible. Chaining Arts cards is preferred while also exploiting overkill as much as possible. For example, if an enemy is nearly dead, it is best to try and overkill with as many cards as possible with a single Servant. Overkill not only vastly improves the effects of your command cards, it also ensures the other minions remain alive for further Noble Phantasm charging. Try to avoid starting with Buster cards and/or switching targets whenever possible.
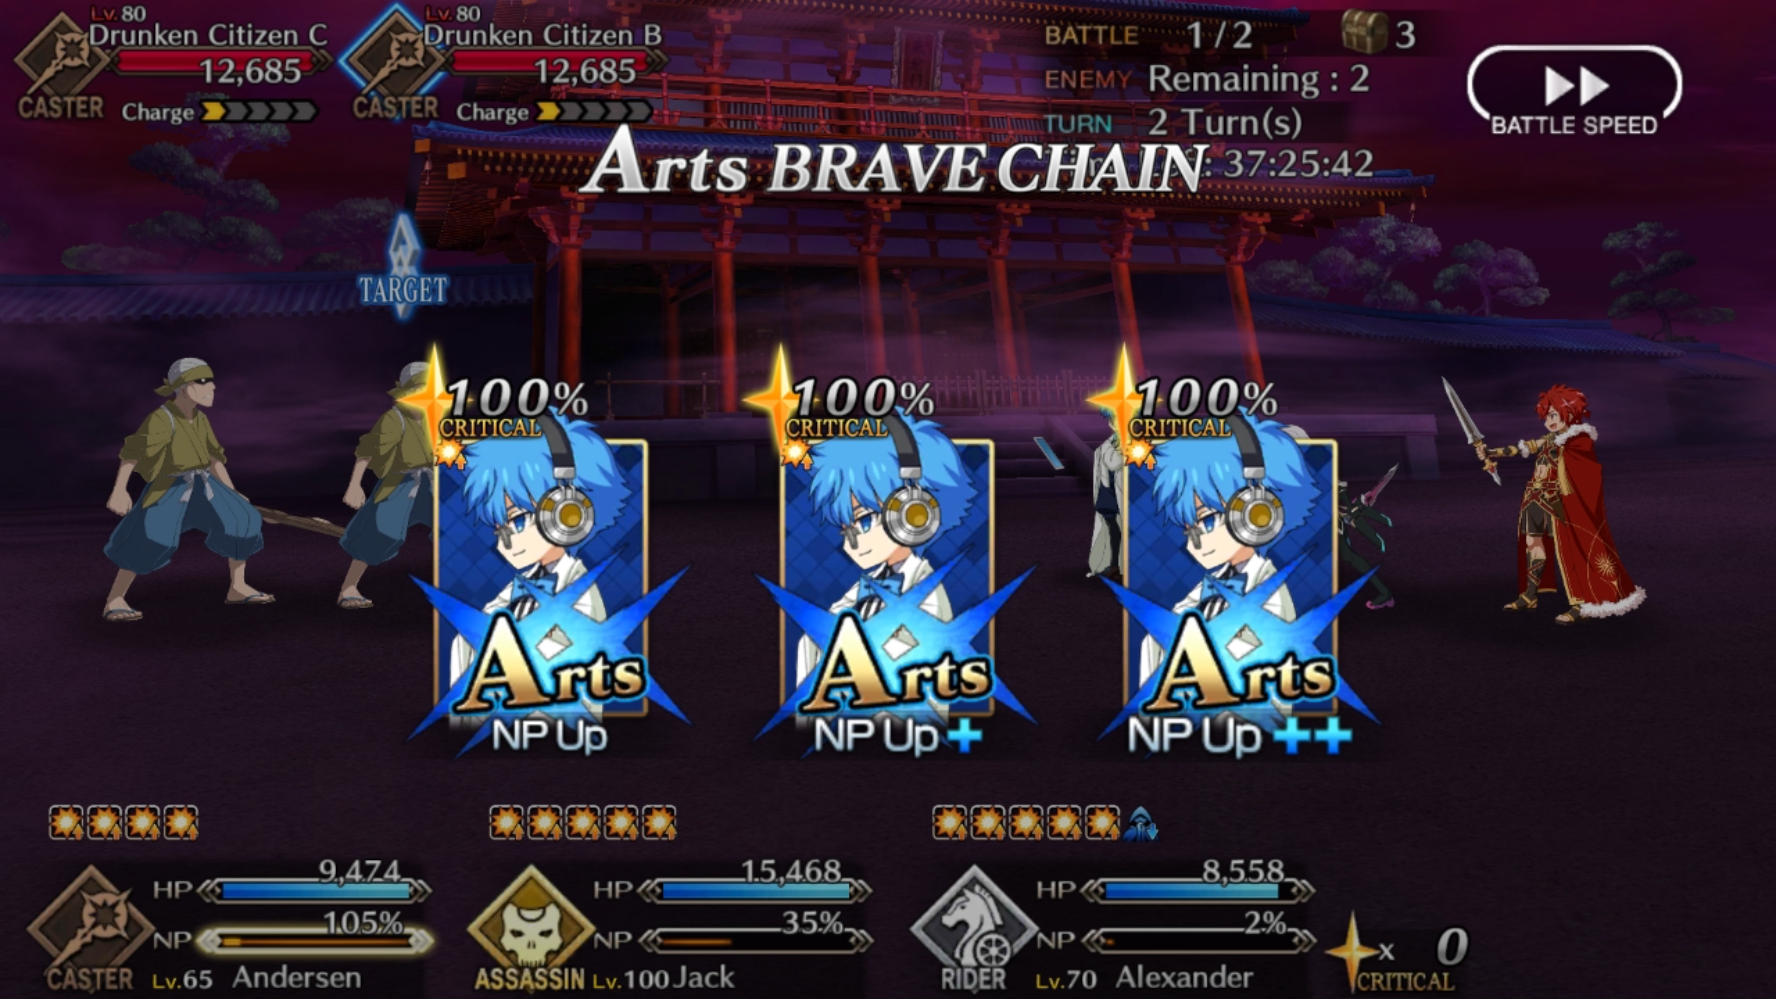
Furthermore, sometimes the boss is accompanied by allies or minor minions. Even such a situation can be turned into an advantage as these minions often hit for less than the actual boss and do use up one of the three attacks the enemy usually does. Still, these minions often possess devastating attacks if they reach the end of their charge bar or possess powerful special buffs. As such, when to kill these minions is often as important as whether to kill them at all.
The gimmick of entire challenge quests may revolve around picking a well planned order in which to dispose of minions and bosses. It may even be that success is near impossible if the correct order is not adhered to. For example, in some challenge quests minions will apply special buffs to their allies upon their death, while in others Servants remained dormant unless provoked by attacks. In the majority of cases though, taking these additional enemies out before they unleash their special attack is often the best course of action.
Part 1.3: Managing Charge Bars and AI
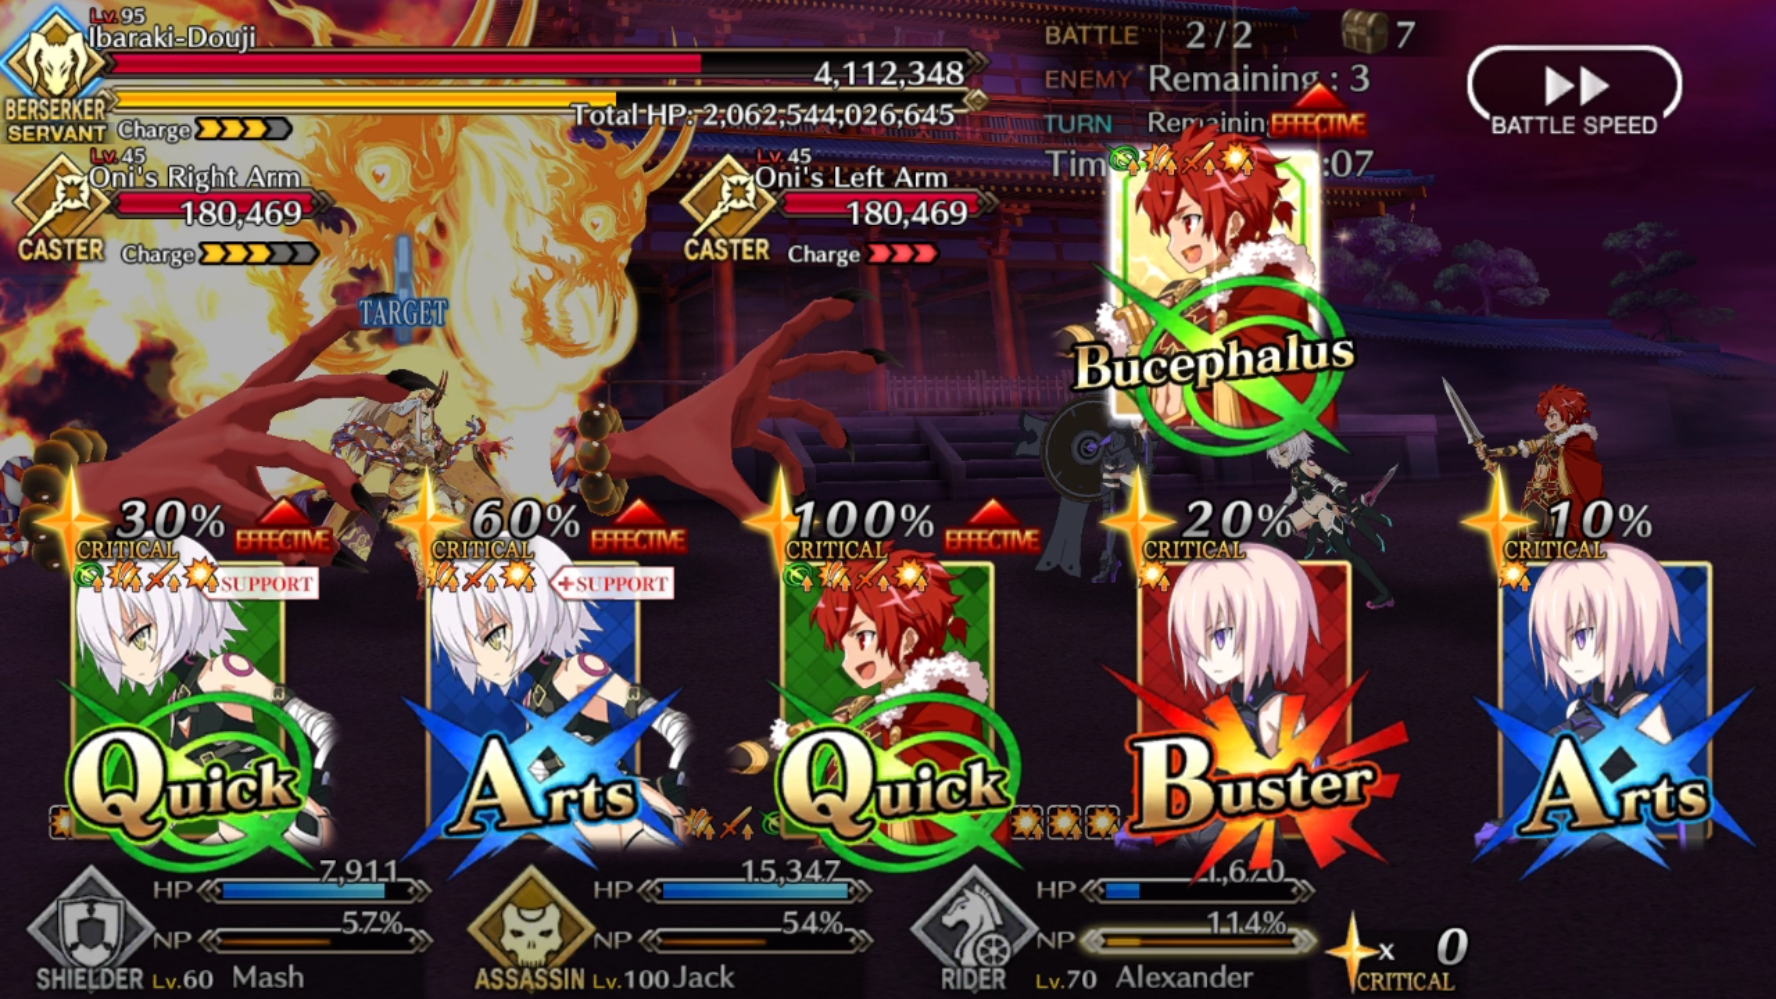
A particular issue when facing multiple strong opponents is that each opponent has a charge bar of their own. The timing of when those charge bars max out may not be synced up. The problem worsens when the enemy has Noble Phantasm charging skills like Golden Rule. Facing multiple Noble Phantasms or powerful special attacks in successive turns is something even the strongest of compositions have difficulty dealing with. One common solution is to sync up these charge bars through disables like stuns, reducing the charge bar with Vampirism skills, or sealing Noble Phantasms. Once these charge bars are synced up, single turn skills like Evasion can be used to tank all the Noble Phantasms or special attacks at once. Alternatively, it is possible to simply kill the most threatening targets and only let the weak Noble Phantasms through. A combination of these two methods is often best.
It may seem that the enemy AI is fairly random, but even the enemy tends to follow a couple of loosely followed rules. The better one can predict the AI, the easier it is strategize in the turns ahead. In general, the opponent will have up to 3 actions at their disposal. In time, some skill activations based on special gimmicks in the encounter may ignore this rule, but in terms of attacks there have never been more than three per turn. Usage of a skill by the enemy will take up one of the potential attacks and trying to bait one of these skills out, provided the effect is not too debilitating, can be a huge boon. Whenever a boss comes with personal defensive skills, the boss will be more likely to trigger these when their HP reaches a damaged or critical state. Generally, the AI is more lenient in the case of Evasion and Invincibility skills in that they will not immediately trigger the skill again in a subsequent turn. If the boss does have a tendency to do so, bringing a counter like Sure Hit or nvincibility Pierce is advised.
Not all classes and rarities are created equal however. What rarity and class an opponent has will affect how many actions they are given by the game. While most gold Servants and creatures will act three times for example, gold Berserker Servants will only move twice per turn. Lower rarity creatures and opponents often behave similarly in that bronze opponents will only attack once or twice while silver opponents often attack at least twice. Finally, actions are usually given from left to right. If the opponent on the right hand side has been defeated, the opponent on the left hand side will be given an extra action, provided their rarity and class allows it.
Part 1.4: Special Gimmicks
Most of the upcoming challenge quests, and most difficult bosses, possess some form of special gimmick. Depending on what Delightworks has cooked up, some Servants become better picks than they would otherwise be.
As such, the next thing to check up on is which enemies in particular are in the challenge quest. By having a look at their skills it is possible to make sure the appropriate countermeasures are in place. For example, facing a boss with a Noble Phantasm charging skill will heavily affect just how often they cast their Noble Phantasm. Likewise, a boss that possesses a dodge or Invincibility can throw a wrench in any carefully crafted plan if activated at an inopportune time. In these cases coming prepared with some counters is a great idea. Servants like Jack can simply strip the enemy of their buffs or perhaps there is a Sure Hit Craft Essence gathering some dust in the Servant load-out.
Particular care should be taken for buffs and gimmicks Delightworks may have added to an opponent. These measures often betray the core design behind the challenge quest and give a large hint towards creating a specially adapted team for it. As a rule of thumb, countering these additional mechanics is often of more importance than countering the basic abilities of the opponent.
Some buffs the enemy may possess are especially worrying and care should be taken to spot these quickly. An enemy that possesses Sure Hit or Ignore Invincibility can completely wipe out a front-line if the player is caught unprepared. Some Noble Phantasms may also pierce damage reduction buffs, but these are easier to work around.
Apart from the enemy’s skills, another worrying aspect of the boss is their Noble Phantasm. How dangerous that Noble Phantasm is largely depends on whether it is an AoE (Area of Effect) attack or not. AoE Noble Phantasms are much more lethal when the boss is very high level and even stacking damage reduction buffs up to 60% may not save a team from a complete party wipe. As such, single target Noble Phantasms tend to be much easier to manage as there are simply more tools available in the game to deal with them. A well placed taunt can redirect a single target Noble Phantasm entirely, or perhaps the boss targets the one Servant that does have a dodge. At times, even letting one Servant die may simply be an acceptable loss for the team.
There are sadly much fewer options available for AoE Noble Phantasms. Skills like David’s Harp of Healing become tremendously useful for being able to absorb an AoE Noble Phantasm, but personal damage prevention buffs are also a great premium to have here. Furthermore, preventing these Noble Phantasms from being cast entirely, or very rarely, is always an option and stacking skills like Vampirism to reduce the enemy charge gauge can work really well. Perhaps the only solution at times may be to simply clear the encounter before any enemy Noble Phantasms can possibly be used. Try to assess before the fight even starts just how dangerous that Noble Phantasm really is and what Servants are available to counter it.
Part 1.5: In Conclusion
Whenever a new challenge quest or boss is encountered, consider the following things:
- First, check up on what enemy classes are contained in the fight.
- Preferably make sure that the main damage Servant has class advantage.
- All skills/levels being equal, Class advantaged>Berserkers/Avengers>Neutral classes.
- Does the boss have an additional weakness through one of their traits?
- Assess whether it is possible to exploit any early waves.
- Think about whether the boss has minions and when/if they should perish.
- If the fight consists of multiple strong opponents, which clearing order should be adhered to?
- Are there any skills that should be countered?
- What, if any, gimmicks has Delightworks added to the encounter?
- Can the boss ignore defensive measures with Sure Hit or Ignore Invincibility?
- Does the boss carry an AoE Noble Phantasm or a single target one? Adjust accordingly.