Sakata Kintoki


Traits
Tags

Append Skills

Class Skills
Noble Phantasm


Deal significant damage to a single enemy that ignores DEF Up. ▲ Decrease Buster Resist for a single enemy by 30% (2 turns). ▲
“If it’s gold, it can’t be bad.”
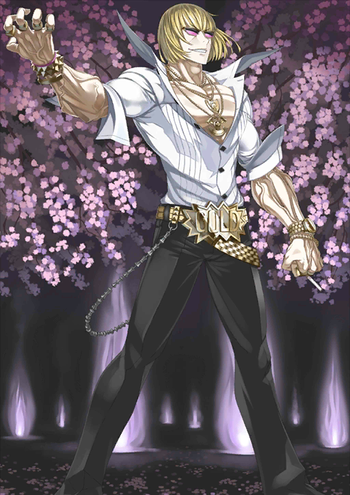
Known as the golden boy Kintarou during his childhood, Sakata Kintoki retains both his childlike innocence and fabled superhuman strength in his adulthood. His kit reflects this fact, featuring an easy to use yet effective skillset capable of dealing high amounts of Buster damage as swiftly as the thunder he wields.
Sakata Kintoki is best-known for two things - his high burst damage as well as the capability to unleash a very early NP, traits gained from his Monstrous Strength and Animal Communication skills respectively. These, combined with Kintoki’s high attack stat and Berserker class, present him as a very potent, nearly universal nuking option. Animal Communication’s NP Charge also has the added benefit of allowing Kintoki to be very flexible with his teammates and CE choices, the latter of which is a valuable feature for event farming as he can equip event CEs while still maintaining high performance.
However, Kintoki’s burst damage relies heavily on his NP and Monstrous Strength, and with no other means to deal meaningful burst damage, he is often left a sitting duck when these are either not available or made ineffective by any special boss mechanics. This is also where Golden’s biggest weakness comess in, which is his practically nonexistent defensive aspect. While Natural Body attempts to fill his lack of hard defensive skills - assisted by the occasional stun from Golden Spark - these are not nearly enough when considering the double damage he receives as a Berserker, and leaves Kintoki susceptible to dying before he can unleash a second NP.
All in all, Kintoki fills the role of a glass cannon to the letter, whose fragility may find him sidelined in favor of other, tankier Berserkers. This however doesn’t take anything off his nearly-universal, easily-accessed, and powerful burst damage which allows him to trivialize farming and even some harder stages.
ℹ️ Gameplay Tips
Kintoki may have a reputation for a once-and-done Servant, but that isn’t necessarily the case as Kintoki can handle even Break Bars decently well. Launching back-to-back NP strategies are the best way for Kintoki to increase his short-term burst, though at the expense of long-term performance. It is also his way to play around the Break mechanic, enabling him to reliably deplete two lower-HP Break bars.
Similar to other compositions focusing on NP charge, back-to-back NP strategies typically feature at least one Zhuge Liang, and make use of Starting NP gauge CEs, possibly aided by another NP-charging ally (unless a limit-broken Kaleidoscope is used) for the first NP. Zhuge Liang’s NP charging skills and Animal Dialogue can then be used to charge the second NP. Monstrous Strength can be used as needed on either turn
The main perk of back-to-back NPs is that the same 3-turn buffs are applied to both NPs, which ensures Kintoki’s NP hits the numbers it needs to reach.
🟢 Strengths
High Burst Damage
Kintoki’s NP Brave chain is a formidable force to be reckoned with, resulting from a mix of high attack stat, the Berserker class, as well as Monstrous Strength’s attack buff, which notably affects his Extra card as well. A correctly timed NP Brave chain is capable of instantly eliminating medium-health enemy bosses, such as those found in most farming stages. Meanwhile, rearranging the order of cards to exploit any NPs targeting behaviour (e.g. B-B-NP-EX instead of NP-B-B-EX) enables him to take out several weaker targets in one swoop despite his lack of AoE.
50% NP Charge
Aside from NP usage on demand, Animal Communication also enables back-to-back NP setups to be employed, which is Kintoki’s most reliable workaround against the Break Bar mechanic. Such a large NP battery also lets Kintoki be less picky with his teammates and CE picks, accommodating event drop-focused compositions without giving up much performance.
Offensive Reliability
Kintoki’s straightforwardness makes him a very reliable damage dealer - with three Buster cards and an easily-charged NP, Golden is able to get his vaunted NP Buster Brave chains consistently. Additionally, Golden Spark’s defense-ignoring property allows Kintoki to attack unimpeded by defense buffs, while Natural Body’s Attack debuff resistance bonus prevents pesky damage-reducing debuffs from affecting him.
🔴 Weaknesses
Low Durability
While Kintoki possesses the HP pool of a 5-star Servant, his Berserker fragility combined with the lack of damage mitigation skills leave him as one of the least durable Servants around. He isn’t totally defenseless, however, as Golden Spark’s scaling Overcharge Stun is sometimes able to incapacitate a threatening enemy for one turn, and Natural Body recovers a decent chunk of HP. Unfortunately, neither of these prevents Kintoki from being unexpectedly bursted down in one turn, which remains his biggest weakness.
Long Offensive Downtime
As a result of unimpressive generation stats and single Arts card, Kintoki’s offensive strength mostly lies in his skill set, and once this skills are used, it takes some time before he would be able to unleash another Monstrous Strength-infused NP Brave chain., Furthermore, due to Kintoki’s low durability, he is often at risk of being eliminated before his skills become available again.
One-Trick Pony
Kintoki has one job, and that is to vaporize any paltry enemy in an instant manner. For this purpose he is a very effective hammer, but also a very one dimensional hammer. Since he possesses neither any support or reliable utility, nor any different means to boost his sustained performance, Kintoki struggles in (gimmicky) stages where his straightforward burst damage is not enough to do the job.
Level Up Skill Recommendations
While leveling all three skills would give Kintoki a far easier time in general, only his first two skills are crucial to his core playstyle, and they should ideally be maxed if Kintoki is to be used extensively.
Monstrous Strength A+ provides a very potent offensive buff that affects all of Kintoki’s cards (including the Extra card). As his primary source of damage increase, leveling this skill increases Kintoki’s damage ceiling. Still, the advantages granted by a maxed Animal Communication generally outweigh those of Monstrous Strength, and while both are extremely high priority, this skill should generally be leveled second.
While Animal Communication C doesn’t directly increase Kintoki’s damage, leveling it is a very important part of his kit, as having it maxed greatly increases his freedom in teammate and CE choices, as well as enabling back-to-back NP strategies to be employed. The cooldown reduction also reduces the time he needs to wait before unleashing a second NP Brave chain, which may be crucial in harder fights. As such, this skill should be leveled before Monstrous Strength for Masters who rely on Kintoki as their main Berserker.
- Natural Body A’s heal is definitely a nice thing to have, and its Attack Debuff resistance buff a welcome, if situational addition, these don’t typically aid him all that much in farming scenarios, and they only become more important in harder quests. The extra healing gained from additional levels does alleviate some pressure on Kintoki, but given Kintoki takes double damage in practice, it’s effectiveness is often halved. It is generally fine to leave this skill at a lower level.
🖼️ Craft Essence Recommendations
Despite having an NP battery of his own, Starting NP Gauge CEs remain a top choice for Kintoki. Aside from this, he generally favors Buster Performance Up CEs, or NP Damage Up ones for situations involving bosses with high HP.
Golden Sumo: Boulder Tournament: Despite stacking additively with Monstrous Strength, Golden Sumo is still Kintoki's prime choice for general use. After all, it affects all of his Command Cards and Monstrous Strength only lasts for a single turn.
Partake with the King / First Sunrise: Generally these are slightly inferior alternatives to Golden Sumo as most Masters will not have them Limit-broken.. It should be noted, however, that First Sunrise also does not allow for an instant NP, unless LB’d or with additional NP charging.
Holy Night Supper: Although Holy Night Supper’s critical budget seems wasted on Kintoki, its NP damage buff scales multiplicatively with the buffs of most common Buster supports, and thus gives the biggest burst damage increase to his NP.
Kaleidoscope / The Imaginary Element: While the Starting NP gauge provided by these CEs are overkill on maxed Kintokis, they are used in place of the above CEs if Kintoki’s skills are still at lower levels. They are also an essential part to back-to-back NP strategies.
The Black Grail: This CE is Kintoki’s best pick in terms of raw burst damage, overtaking Buster Performance CEs even on full NP Buster Brave chains. As the NP Damage buff is rarely found on supporting Servants, it also tends to scale better with external boosts.
Hero Elly’s Adventure / Limited/Zero Over / Kaleid Ruby: These CEs provide more balanced damage increase distribution, and are ideal picks for Masters who wish for more impactful Golden Sparks, while not being as reliant on it as the Black Grail pick.
Dragon's Meridian (LB): A budget option for Kintoki, an LB'd Dragon's Meridian allows him to use Golden Spark on the first turn, and is an extremely useful pick for cost-heavy teams.















![[JP] New Year's 2028 Guaranteed Lucky Bag Summon (Gender x Class)](https://static.mana.wiki/grandorder/20260101 New Year 2026 Lucky Bag Guaranteed Summon.png?height=256)
![[JP] Crowning Match Saber & Berserker Pickup (Daily)](https://static.mana.wiki/grandorder/20250917 Crowning Match Saber Berserker.png?height=256)
![[JP] Crowning Match Extra Pickup (Daily)](https://static.mana.wiki/grandorder/20250805 Crowning Match Extra Pickup.png?height=256)
![[JP] FGO 10th Anniversary Lucky Bag Guaranteed Pickup Summon (Class x NP Effect)](https://static.mana.wiki/grandorder/20250803 10th Anniversary Lucky Bag Pickup.png?height=256)
![[JP] Crowning Match Berserker Pickup (Daily)](https://static.mana.wiki/grandorder/20250609 Crowning Match Berserker Pickup.png?height=256)
![[JP] Weekly Berserker Pickup 1 (Daily)](https://static.mana.wiki/grandorder/20250414 Weekly Berserker Pickup 1.png?height=256)
![[JP] New Year's 2027 Guaranteed Lucky Bag Summon (Gender x Class x NP Type)](https://static.mana.wiki/grandorder/20250101 New Year 2025 Lucky Bag Summon.png?height=256)
![[JP] Revival Download Milestones Campaign Pickup (Daily)](https://static.mana.wiki/grandorder/20241006 Revival DL Campaign Pickup Daily.png?height=256)
![[JP] 9th Anniversary Pickup Summon (Daily)](https://static.mana.wiki/grandorder/20240806 9th Anniv Limited Daily Pickup.png?height=256)


